Can You Make Cinnamon Rolls With Whole Wheat Baking Mix
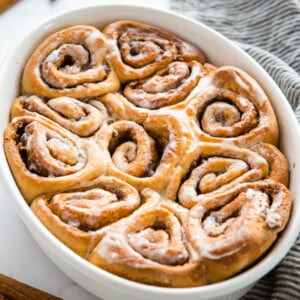
These Best Ever Whole Wheat Cinnamon Buns are sweet and sticky and made with whole wheat. Make the perfect whole wheat cinnamon rolls from scratch with our pro tips! 
![]()
NEVER MISS A POST! FOLLOW ME ON:
FACEBOOK | PINTEREST | INSTAGRAM | TWITTER
 I don't know about you, but I've done a whole lot more baking this year than I normally do – and that's saying something since I'm a food blogger and baking's kind of my job! These Best Ever Whole Wheat Cinnamon Buns are on regular rotation in my baking routine for weekend breakfasts and I just know you're going love them as much as we do!
How to make Cinnamon Buns with Whole Wheat Flour
Making whole wheat cinnamon buns is just the same as making cinnamon buns with all purpose flour – the only difference is that whole wheat flour has a lower gluten density, preventing it from rising as easily or as high as cinnamon buns made with traditional all purpose flour. For this reason, it's important to include some all purpose flour along with the whole wheat flour to help the buns rise and get nice and fluffy. 
5 Pro Tips for Making Perfect Homemade Cinnamon Buns
- Pro Tip #1: Temperature matters!
In order to achieve a fluffy dough that rises well, the temperature of the wet ingredients when they hit the yeast is critical: too cold, and the yeast won't be able to grow; too hot and the liquid will kill the yeast. Both of these situations will cause your dough to be tough and dry, and you'll be lucky if it rises at all.
- Pro Tip #2: Texture matters!
Cinnamon bun dough should be tacky to the touch, but not so sticky that it's very messy. It should pull away from the sides of the mixing bowl easily and the bowl should appear fairly clean. If the dough appears too sticky, continue kneading and add flour one tablespoon at a time until the dough reaches that tacky texture. Too little flour and the dough will be too sticky and will result in dense buns. Too much flour and the dough will be tough, resulting in dry, crumbly buns.
- Pro Tip #3:The secret ingredient!
The maple syrup in this recipe is a fantastic secret ingredient that creates the beautiful golden, sticky bottom to these cinnamon buns. If you're looking for a diner-style cinnamon bun, this is exactly how to do it at home! Pour the maple syrup into the pan, tilting the pan if necessary to make sure the syrup coats the bottom completely. If you want to add a little extra syrup, go ahead. You'll get absolutely no judgment from me!
- Pro Tip #4: Roll out with oil, not flour.
Turn the dough out onto a very lightly greased work surface rather than flouring the work surface. This makes the dough easy to roll out and it helps the surface of the dough to remain soft instead of drying it out like adding more flour would do. I like to spritz my counter top with a little bit of vegetable oil to make sure the dough doesn't stick and it works like a charm!
- Pro Tip #5: Don't over-rise!
For these rolls, a shorter second rise helps to maintain a super soft-textured dough that's fluffy but not too airy. The key here is not to over-rise; the heat of the oven will cause them to puff up even more and if they've risen too much before going in the oven they can actually lose their height and lose their beautiful texture. When large air pockets develop in the dough it creates rolls that are misshapen, which causes them to brown unevenly when baking. Rise for no more than 2o minutes right before baking!
LOOKING FOR MORE BREAD BAKING RECIPES AND TIPS?
Get my guide to Easy No-Fail Homemade Bread!

Homemade Cinnamon Buns Recipe Tips
- If you can resist the temptation, let the buns cool in the pan for about 15 minutes before cutting into them. As always, they'll continue baking on the inside even after they've been removed from the oven. Allowing them to cool slightly will allow the baking process to stop naturally and help the buns maintain their texture.
- The best way to serve these buns is inverted (upside down). You can actually invert the whole pan onto a tray or platter if you're serving these at a brunch, for example. Or, you can cut into them and serve individually. It's up to you! Or, serve them right side up with a simple glaze (get the recipe below!)
- These cinnamon buns are best served on the day they're made, but they store well in an airtight container for a few days and can be reheated for serving.

NEVER MISS A POST! FOLLOW ME ON:
FACEBOOK | PINTEREST | INSTAGRAM | TWITTER
 I hope you love these cinnamon buns as much as we do! Let me know in the comments below, what's your favourite sweet treat to make from scratch? I'd love to know!
Kitchen Products I Recommend:
Looking for more recipes like this? You'll love these:
-
Cinnamon Sugar Twist Buns
-
Lemon Blueberry Sweet Rolls
-
Garlic Butter Dinner Rolls
-
Pumpkin Spice Cinnamon Rolls
-
Cranberry Orange Sweet Rolls
-
Strawberry Cheesecake Sweet Rolls
-
Ham and Cheese Pizza Rolls
LOOKING FOR MORE BREAD BAKING RECIPES AND TIPS?
Get my guide to Easy No-Fail Homemade Bread!
RECIPE VIDEO
Watch the video below to see how I make homemade cinnamon buns. You can find even more delicious recipe videos on my YouTube channel.
For the dough:
- 1 1/4 cups milk
- 1/3 cup sugar
- 1/3 cup butter
- 3/4 tsp salt
- 1 egg
- 1 1/2 cups all purpose flour
- 2 cups whole wheat flour
- 2 1/4 tsp instant dry yeast
For the filling:
- 1/3 cup butter melted
- 1 cup brown sugar
- 1/2 - 1 tbsp cinnamon to taste
- 1/2 cup real maple syrup
Also Needed:
- 1-2 tsp vegetable oil for rolling out dough
- Butter for greasing the pan
For the glaze:
- 2 tablespoons butter at room temperature
- 1 cup powdered sugar
- 1-2 tablespoons milk or cream (add 1 teaspoon at a time)
-
Into the bowl of your stand mixer, measure out the all purpose flour, whole wheat flour, and the yeast. Mix these two together for a few seconds, just until they're combined.
-
Next, melt 1/3 cup butter in a saucepan on the stove over medium heat. If you're thinking to cut a corner here and melt your butter in the microwave instead, don't do it! If the liquid is too hot, it will kill the yeast. Once it's melted and starts to bubble, remove it from the heat and stir in the 1/3 cup sugar and the salt until you can see and feel the grains beginning to dissolve in the hot butter. Add the milk slowly, stirring constantly. You're looking for the milk and butter mixture to be about 105 degrees Fahrenheit, but if it feels only slightly warm to the touch (slightly above room temperature) you're good to go.
-
When your wet ingredients have reached the ideal temperature, add in an egg and break it up with a fork into the mixture.
-
Pour the wet ingredients into the dry ingredients in the bowl of a stand mixer. Make sure your stand mixer is fitted with the dough hook attachment.
-
Turn your mixer on low and watch the ingredients combine. After about a minute you should see a sticky dough starting to come together. If you need to turn the mixer off and scrape down the sides and bottom of the bowl, now's your chance.
-
Turn up the mixer speed slightly and allow the mixture to knead the dough for about 3 minutes. The dough should be tacky to the touch, but not so sticky that it's very messy. It should pull away from the sides of the bowl easily and the bowl should appear fairly clean. If the dough appears too sticky, continue kneading and add flour, one tablespoon at a time, until the dough reaches that tacky texture.
-
If you don't have a stand mixer, you can knead the dough by hand on a lightly floured work surface for 5 minutes after the wet and dry ingredients are combined.
-
Cover the bowl with some plastic wrap and move it to a warm place in your kitchen to rise for about 2 hours. It should have doubled in size after about 2 hours.
-
Once you notice your dough has risen fully, and before you do anything with it, grease a large rectangular pan (at least 9x13 in size) with some butter. Pour the maple syrup into the pan, tilting the pan if necessary to make sure the syrup coats the bottom completely.
-
Turn the dough out onto a work surface that's been very lightly greased with vegetable oil. Using a rolling pin, roll out the dough evenly until you have a rectangle that's approximately 18 inches wide and 12 inches deep. Brush the dough with the melted butter.
-
In a separate bowl, combine the brown sugar and the cinnamon. I use 1 tbsp of cinnamon, but feel free to use a little less if you'd prefer a more subtle taste. Spread the brown sugar and cinnamon mixture evenly over the dough.
-
Roll up the dough from the long side until you've got one long roll. Cut the long roll in half, then in half again, and then each of those sections into 3 pieces until you have 12 cinnamon rolls. Try to cut the rolls to an even thickness as this promotes even baking. You don't want some rolls to be overdone and others to be raw in the middle.
-
Arrange the 12 pieces in the pan you've greased and nestle them into the maple syrup in the bottom. An arrangement of 3 rows of 4 works well in a rectangular pan.
-
Cover the pan with a clean kitchen towel and set them aside to rise. It's a good idea to preheat your oven at this time, too. Set temperature to 350 degrees Fahrenheit.
-
Once the rolls have risen for 20 minutes (no longer), place them in the oven to bake for about 40 minutes, or until they're a nice even golden brown.
-
Remove the pan from the oven and let the buns cool in the pan until they're almost completely cool.
For the glaze:
-
In a medium bowl mix the butter and the powdered sugar until combined.
-
Add the milk one teaspoon at a time until a thick glaze forms.
-
Spread the glaze over the slightly warm cinnamon buns, and serve.
To make these cinnamon buns in an oval pan (as pictured), simply cut only 11 buns instead of 12 and bake as directed.
Serving: 1 serving | Calories: 426 kcal | Carbohydrates: 72 g | Protein: 7 g | Fat: 14 g | Saturated Fat: 8 g | Cholesterol: 46 mg | Sodium: 277 mg | Potassium: 214 mg | Fiber: 4 g | Sugar: 43 g | Vitamin A: 445 IU | Calcium: 86 mg | Iron: 2 mg
Can You Make Cinnamon Rolls With Whole Wheat Baking Mix
Source: https://thebusybaker.ca/best-ever-whole-wheat-cinnamon-buns/
0 Response to "Can You Make Cinnamon Rolls With Whole Wheat Baking Mix"
Post a Comment