How to Cover Cardboard With Scrapbook Paper
West Hills Crafts For Kids
Whether you're a stay-at-home parent or you're living that work from home life right now, there are plenty of ways to keep the whole family entertained. We've created this fun, kid-friendly page, to help you from going stir-crazy.
Be sure to check back weekly for new crafts guaranteed to bring a smile to everyone's face!
Week 6
DIY KALEIDOSCOPE KIDS CRAFT
MATERIALS:
- Paper Towel Tube
- 12 x 12 Card Stock or Scrapbook Paper
- Thin Clear Plastic (can be scrap from packaging)
- Colorful Translucent Beads
- Cardboard
- Aluminum Foil
- Hot Glue Gun
- Scissors
- Marker
- Washi Tape or Other Decorations (optional)
INSTRUCTIONS:

1. If you are using plain white paper, you can have the kids color and draw on it first.
2. Squeeze glue all over the scrapbook paper and roll the paper towel tube up in it.
3. Hold it together for a few seconds to give the glue time to stick.
4. Cut any excess paper from the ends.

5. Trace the end of the paper towel tube on the scrap plastic three times and cut out all three circles.

7. Hot glue one circle on the bottom end of the paper towel tube.

8. Drop your beads into the tube. Put enough to almost cover the plastic. Then place the second plastic circle inside the tube.
9. You will need to use a pencil or marker to push it down to the bottom and loosely cover the beads. Do not push it snug up against them! If it is too tight, then the beads won't move around between the plastic discs

10. Cut three strips of cardboard that are 1 inch wide and almost as long as the tube you are using.
11. Cover each strip with foil.
12. Glue them into a triangle shape and place inside the tube.
13. This will create the kaleidoscope effect when the kids look inside!
Note: The triangle pieces need to be almost as long as the tub, just a little shorter to make sure the end cover goes on right.
14. Glue the three 1″ pieces together into a triangle and slide into the tube. The triangle piece should be pretty snug between the plastic ends (I would slide the triangle in then place the 3rd piece of plastic on the end, without gluing yet, to check the length.) If the triangle part is too long, cut more off the end. If it seems too loose inside, you could place glue on one end, sticking it to the plastic.
15. Almost done! Now, glue the last plastic circle on the open end of the paper towel tube. This will be the end they look through.
Let the kids decorate with Washi tape, stickers, or color on it if they didn't already.
Once they are done, hold your homemade kaleidoscope up to the light and turn to view!
Week 5
Fun Paper Plane Game
Get ready for some all-ages play with this DIY target game!
What you will need: Poster Board, Scissors, Markers (or Crayons), Bookends, Sheets of Paper, Paperclips
To Begin
Step 1

Crease letter-size paper the long way, then fold top corners into center seam.
Step 2

Lower point to about 1 inch above bottom edge.
Step 3

Repeat step 1, then lift small triangle under folds so it points up.
Step 4

Uncurl a paper clip, leaving a hook on one end. Glue or tape it to center seam so hook hangs.
Step 5

Fold both wings down so top edges line up with bottom. Loop a rubber band around end of paper clip to launch.
Let it fly!

Week 4
Blacklight Party DIY Glow Bubbles

What you will need:
Big Bottle of Bubble Solution, 2 Highlighters, Pliers/Wire Cutter, a black light
Helpful Hints: You can use any highlighter color that you like, just be sure to check ahead of time with a black light to make sure it glows. Also make sure you're checking that the actual ink glows and not just the plastic of the marker container. To do this, scribble a mark with the highlighter and check that! If you are using the Sharpie brand we have saved you a step – the Yellow, Pink and Green are the ones that glow! In our opinion, the skinny sharpie highlighters are the easiest to work with.

Directions:
1. Extract the ink-filled tube from inside the marker. With these smaller Sharpie highlighters, simply grab that end piece with your pliers and wiggle it off. Then shake or pull the tube out. Be careful handling the tube because it will be pretty full and you could easily get the ink everywhere if you aren't careful.
2. Open the cap on your bubble solution container and drop the ink tube in. For a big bottle of bubbles (100 oz.), we recommend 2 highlighter tubes; however, one tube would work in a pinch or if you're using less bubble solution.
3. Replace the cap and you can shake it a bit, although really it just needs some time and all the ink will eventually make its way out of the tubes and into the bubble solution. We recommend creating the bubble solution at least a few days ahead of time no make sure the ink properly mixes with the bubble solution.
Week 3
Colored Kitchen Volcanoes

What you will need: Baking Soda, Vinegar
Additionally, for this experiment, you need to set up glasses that you will pour vinegar in to be the base for your volcano. Any mini glass that you could use for desserts would work but if you don't have those just take some paper cups and cut them in half.
Directions:
1. Sit your cups of vinegar in a large glass dish or on a cookie sheet to catch the "lava". Add a few drops of food coloring to each cup and stir.
2. Take a scoop of baking soda and drop right into your cups of vinegar and watch the lava happen!

Week 2
Marshmallow Play Dough

Are you ready to make your own play dough? Using Marshmallows, this play dough is taste-safe and only minutes to prepare.
Play Dough Recipe (per color)
- 6 large marshmallows
- 3+ tbsp of corn starch
- 2 tsp coconut oil (Other oils will also work)
- Food coloring
Note: You will also need a microwave.
Directions:
1. Combine all of the ingredients in a microwave safe bowl and microwave for 30 seconds (or until marshmallows expand).


2. Carefully remove the bowl from the microwave, and mix the ingredients with a spoon the best you can. Things will be pretty sticky at first, but just keep mixing. Once the ingredients are cool enough you will want to mix & knead the play dough with your hands.
3. Add more cornstarch if needed to reach the desired consistency. (The cornstarch helps the dough become soft, more pliable and less sticky). Be sure to add the cornstarch slowly, if you add too much the dough will become crumbly.
4. Keep kneading until the dough is formed. Then, wash your hands, and knead the dough once more with clean, dry hands. After a bit of handling you will be left with your very own play dough! Repeat the above steps for each color of marshmallow play dough that you wish to make. Then, the fun can begin!
Week 1
Fireworks in a Glass
You will only need 3 household items to have yourself some fun and exciting crafts that your kids can enjoy! The items you will need for this craft are: Food Coloring, Water, Oil (of any kind)
Directions:
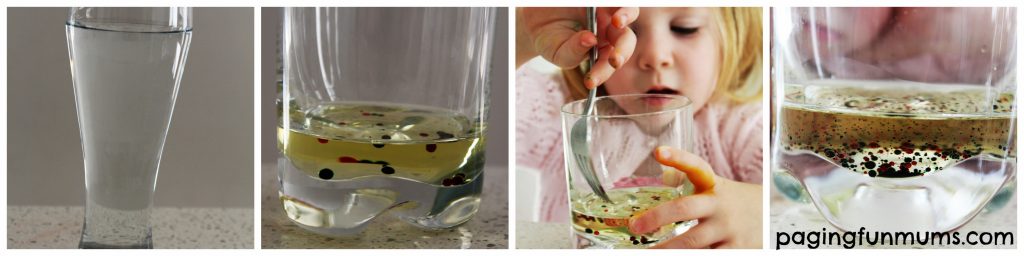
Step 1
Fill a glass 3/4 of the way to the top with warm water
Step 2
In a separate glass add a few table spoons of oil and add 4 drops of food colouring – of differing colour
Step 3
Using a fork, give the oil and food colouring mixture a good mix to break up the 'colour beads' into smaller ones
Step 4
Carefully pour the oil & food colouring mixture into the glass of warm water and wait for the magic to happen!
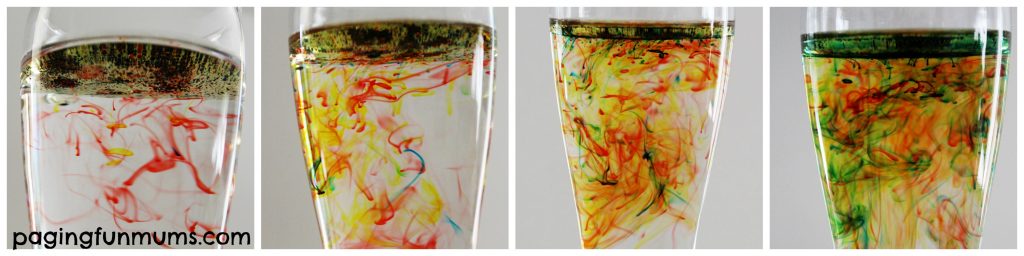
How it works:
Food coloring dissolves in water, but not in oil. When you stir the food coloring in the oil, you are breaking up the coloring droplets (though drops that come into contact with each other will merge… blue + red = purple). Oil is less dense than water, so the oil will float at the top of the glass. As the colored drops sink to the bottom of the oil, they mix with the water. The color diffuses outwards as the heavier colored drop falls to the bottom" – about.com
How to Cover Cardboard With Scrapbook Paper
Source: https://www.westhillscountryclub.com/kids-crafts/
0 Response to "How to Cover Cardboard With Scrapbook Paper"
Post a Comment